|
| Mariner's Compass Floor Cushion. Photo by Danielle Collins |
Awhile back, I made a floor cushion for my friend
Kim featuring her first fabric line,
Tidal Lace. Since her fabric is inspired by the sea, I decided that something featuring a Mariner's Compass block would be just the thing! Want to make one as well? Although I didn't photograph every step of the process, I'll walk you through the basics of foundation paper piecing the compass block and point you in the right direction for good tutorials for the rest of the cushion. I won't lie, it's not the easiest thing in the world to whip up, but you can do it!
To make a 24" square floor cushion of your own, you will need:
MATERIALS:
TOOLS:
Rotary cutter
Cutting mat
Rotary Cutting Ruler
Sewing Machine with zipper foot and walking foot and hoping foot
Basic sewing supplies like scissors, thread, pins, etc.
Thread to match cushion
Printer & plain white printing paper
Tape
Washable glue stick
Freezer paper
Spray Baste 505
Blue painters tape
Pencil
Exacto knife
FOUNDATION PAPER PIECING THE TOP:
Download and print the
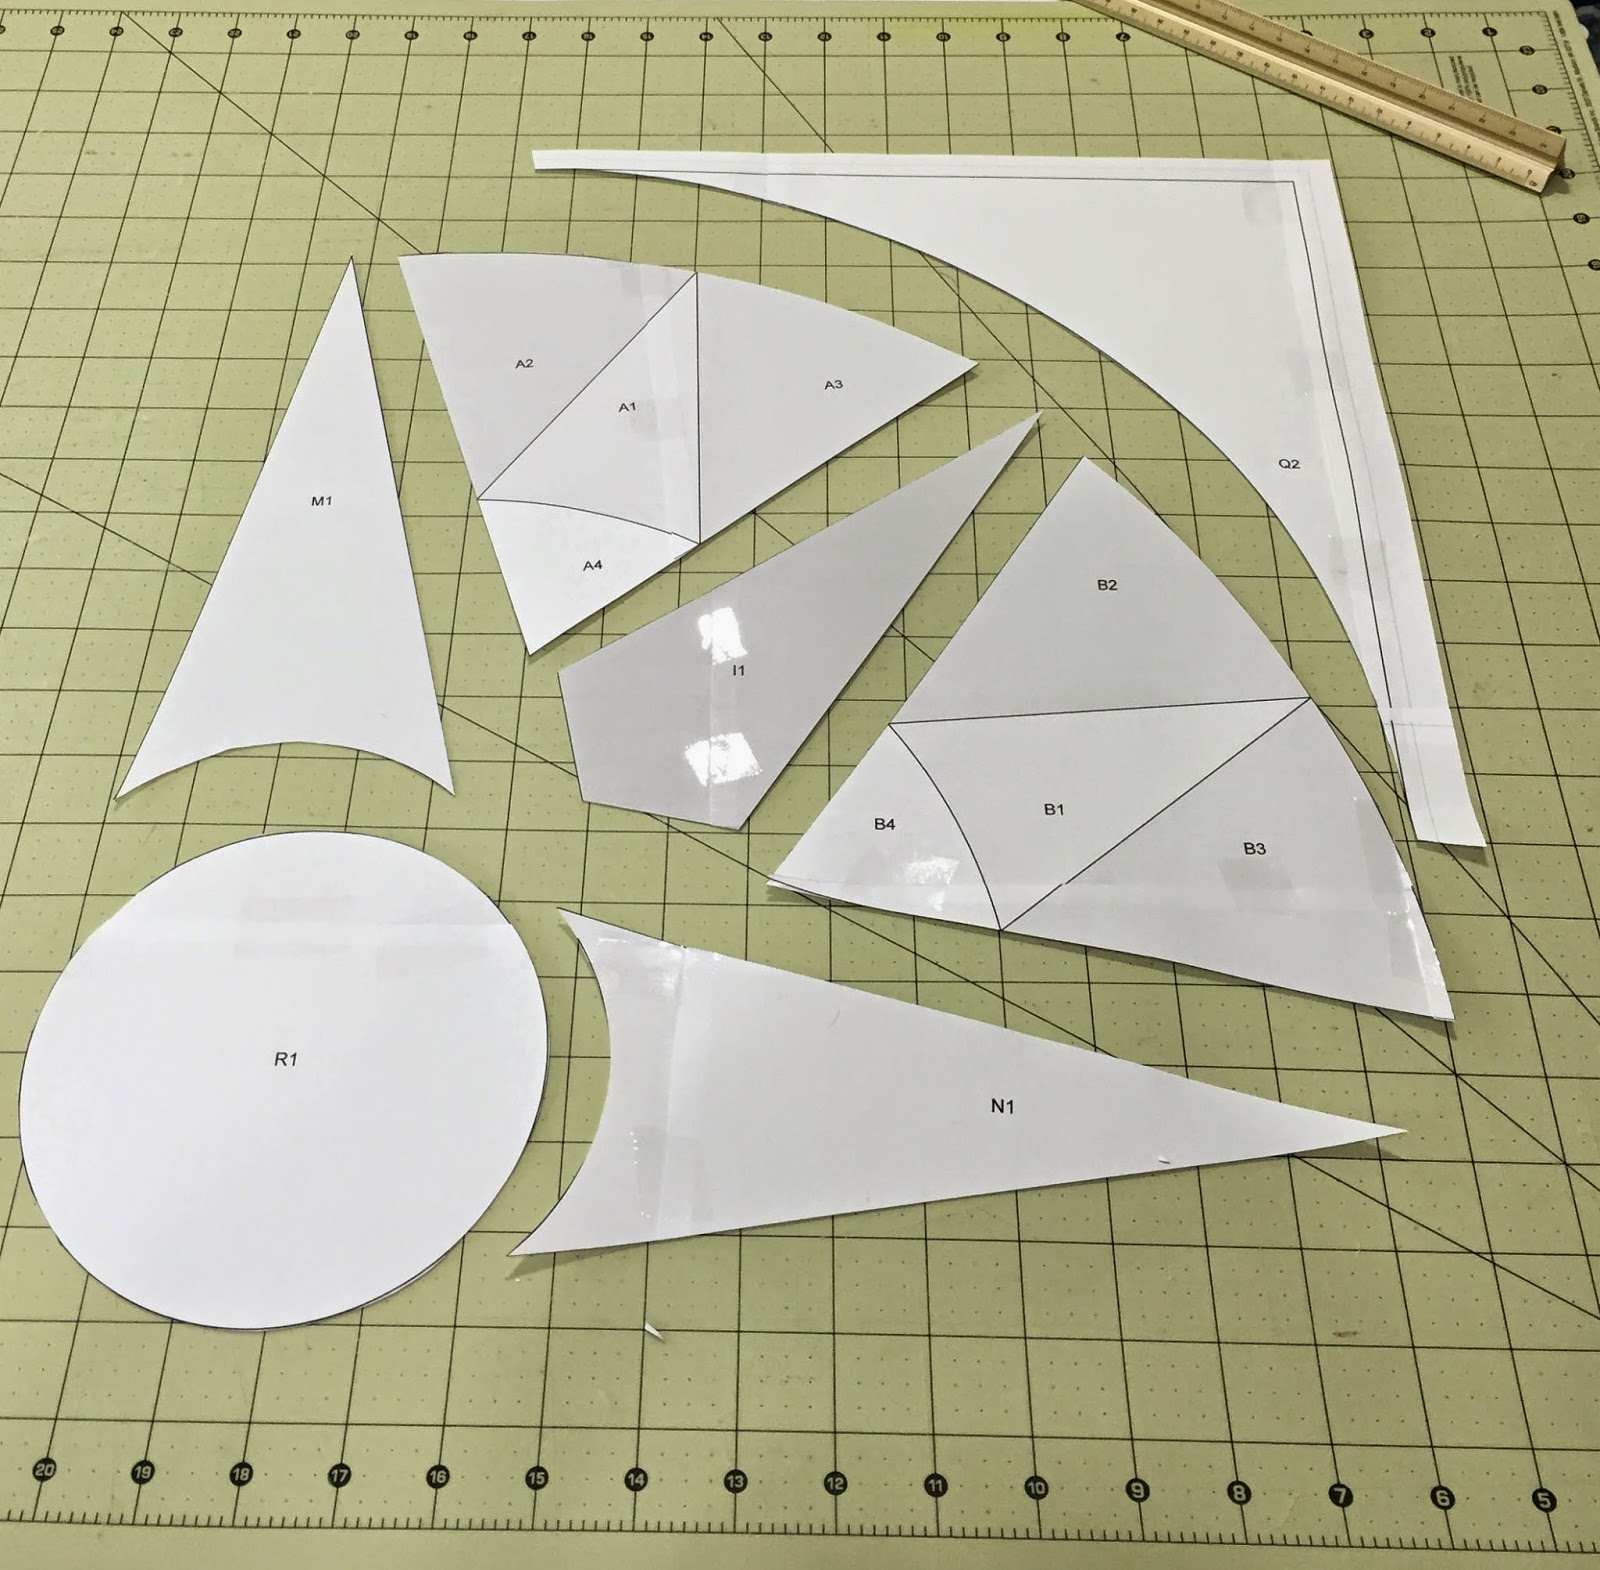
PDF file for the Mariner's Compass block. Make sure that the PDF is not scaled to fit the page or resized when you print it. You will need to tape the pages together to form the completed block, as seen in the picture below.
If possible, avoid taping over the dark outer lines of each shape. You'll need to stitch through and rip out the paper along these lines later, so the less tape on those parts the better!
Cut your pattern apart, keeping each similarly lettered section uncut as in the photo below.
FABRIC CUTS:
- Fussy cut four 8" x 25" strips of the large border print that runs along the bottom of the Tidal Lace Coral fabric featuring the large, lacy tide-pool creatures for the sides of the cushion
- 25" x 25" square of Tidal Lace Coral for the bottom of the cushion
- 4.25" strip of Tidal Lace Coral, (using what is left over from your fussy cutting for the rest of the cushion *
- 4" strip of Shimmer Aqua (along the selvedge edge as it's a directional print)*
- 5-1/2" x 42" strip of Starlight Seafoam*
- 4" x 42" strip of Tide Pool Seafoam*
- 5" x 42" strip of Tidal Lace Deep Sea solid blue
Cut the following in both batting and muslin:
- 2 pcs. 26" x 26"
- 4 pcs. 9" x 26"
*I usually use each strip until I run out of it and then cut another, instead of cutting all the strips I will need for a project at once. That way, if I've made a cutting or measuring mistake, it's not such a big deal!
Starting with the wedge labeled A1 - A4 complete the following steps:
- With the printed side of the paper facing away from you, place a little dot of glue in the middle of the triangle marked "A1" with the glue stick. Position the Shimmer Aqua fabric on the A1 triangle, sticking the wrong side of the fabric to the paper and making sure that the edges of the fabric are at least 1/4" over the black line outlining the A1 triangle (PHOTO A/B). Hint: That line will be your sewing line, so you want to make sure you have enough fabric outside of it to get a 1/4" seam!
- From the paper side, fold the A2 flap along the black line (PHOTO C). I use a postcard to help me get a crisp edge when I fold the paper over (PHOTO D).

- With the paper side up, re-fold the paper over along on of the black lines (PHOTO E). Using a rotary cutting ruler, measure and cut 1/4" on the outside of folded paper edge (PHOTO F).
- Do the same with the other side to create a triangular shape (PHOTO G).
- With fabric right sides together, lay the strip of Starlight Seafoam over your triangle, lining up the cut edges (PHOTO H). Make sure that your Seafoam fabric strip overlaps the edges of the paper at least 1/2". Pin together.

- Paper side up, sew directly along the solid black line. The fabric you've pinned becomes sewn together with a 1/4" seam allowance (PHOTO I). Hint: set your sewing machine stitch a little smaller than usual, this will help you later when you rip out the paper. Also, don't forget to pull your pins out before you sew over them!
- Fabric side up, press your seam and then trim your fabric along the outside straight edge of the paper, making sure to cut 1/4" outside of the paper edge (PHOTO J).
- Repeat with section A3 (PHOTO K).
- Using scissors, cut along the curved solid line between A1 and A4 (PHOTO L). Set A4 aside.
- Using your ruler as a guide, mark a 1/4" seam allowance on the curved outer edge of your paper.(PHOTO M/N).
- Cut along the marking (PHOTO O).
- Use this same process to cut along the bottom curved edge of A1 (PHOTO P). (Remember that you always have to add the 1/4" seam allowance beyond the paper edge!)
- Cut a 4" square from your strip of Tide Pool Seafoam fabric. Put a dot from the glue stick on the back of paper piece A4. Stick paper to the wrong side of your 4" square.
- Using the same method as show in photo M, mark a 1/4" seam allowance along the curved top edge of the fabric above A4. Cut along the marked line.
- Using your ruler, cut 1/2" from the outside straight edges of A4. (YES! 1/2" on these seams, not the usual 1/4". Trust me on this one!) PHOTO R.
- Fold A4 in half and crease. Do the same for A1. Right sides together, match A4 to A1, using the creased center (PHOTO S). Pin together along the cut edges (PHOTO T).

- You can remove the A4 piece of paper if that makes things easier (it will) and sew with a 1/4" seam allowance (PHOTO U).
- Using a hot iron, press the seam open with the paper side against the ironing board (PHOTO V).
- Using your paper with A2 and A3 as a guide, trim the outside edges so that you have a 1/4" seam allowance all the way down the triangle (PHOTO W).
- You now have a completed wedge! (PHOTO X)
- Complete the above steps for sections B through H.
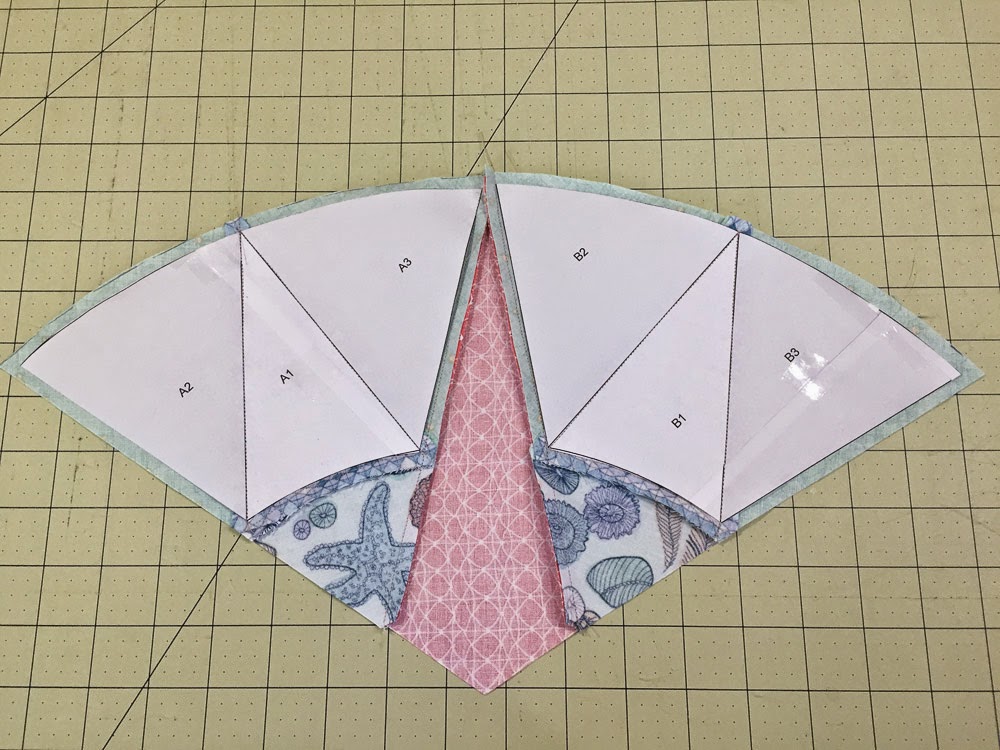
Put a spot of glue on the back of paper piece I1 and center it on the strip of Tide Lace Coral. Cut out the shape, adding 1/4" seam allowance all around.
With right sides together, sew I1 to Section A and then to Section B.
Complete with the remaining sections to create 4 large wedge sections that look like the photo above.
Put a spot of glue on the back of paper piece M1 and center on the Deep Sea solid blue. Cut out the shape, again adding the 1/4" seam allowance.
With right sides together, sew to Wedge A/B.
Repeat with the remaining 3 wedges.
Complete the circle by sewing all of your sections together.
ADDING THE OUTSIDE EDGES:
Put a little glue on the back of paper piece Q1 and position it on the wrong side of your Tide Pool Ocean fabric, making sure to leave at least 1/2" extra fabric all the way around the outside of the paper.
Mark your 1/4" seam allowance on the curved edge and cut.
Add 1/4" seam allowance to the short sides of the template and cut.
Add 1/2" seam allowance to the long outside edges of the template and cut.
Repeat with the remaining three Q sections.

- Fold one of your Q templates in half and mark with a pin along the curved edge. Then fold each half section in half again in order to mark each quarter section with a pin.
- Using 1/4" seam allowance, sew the short edges of the Q fabric pieces together and press open.
- Note that on your Mariner's Compass circle, each section is already divided into quarters with the "compass" points.
- Starting with the upper left quadrant and with fabric right sides together match the curved inside edge of the Q template with the curved outside edge of the wedge, using the pins to help you align. Pin the two together and repeat with the remaining 3 Q pieces.
- Continuing with a 1/4" seam allowance, sew the Tide Pool Ocean fabric to the compass circle.
- Press.
ADDING THE CENTER CIRCLE:
Cut out a 7" square of freezer paper.
Glue the R1 circle template to the top of the freezer paper.
Cut around the template. Keep the circle as perfect looking as possible!
Using the tutorial
here, create a circle with your Tide Pool Ocean fabric.
Once you've removed the freezer paper, fold the circle into quarters and finger press to crease.
Use the creases to help align the circle on your compass block.
Pin in place.
Stitch the circle to the compass by using a matching blue thread and straight stitching all the way around the circle right inside the folded edge.
Gently remove all the remaining paper inside of your block, give it a press, and your block is complete!
 |
| Completed Mariner's Compass block |
QUILTING THE SECTIONS:
With the blue painter's tape, tape a square of muslin to a flat surface so that it is taught but not stretched. Mask the area outside of the square with some scrap paper, such as newspaper to avoid over-spray. Using the Spray Baste 505, lightly spray the muslin. Smooth a layer of the batting on top of the muslin and lightly spray the batting. Place your Mariner's Compass block, right side up on top of the batting and smooth the quilt "sandwich" together, making sure there are no wrinkles. Repeat this process with the Tidal Lace Coral 25" bottom square and each of the 4 Tidal Lace Coral long rectangular sides.
Quilt the sections together using a walking foot for straight line quilting or a hoping foot for free motion quilting. For the Mariner's Compass block, I stitched in the ditch along all of my sewing lines to accentuate the pattern. For the bottom square, I quilted in a simple diamond pattern. On the rectangles, I free motion stitched following the drawn lines of the tide-pool creatures.
Once the sections are each quilted, cut off the excess batting and backing fabrics, using a rotary cutter and ruler. You should be left with two 25" squares and cut the rectangles so that you have four 8" x 25" pieces.
SEWING IT ALL TOGETHER:
**IMPORTANT NOTE***
Now that we're moving on to sewing up the cushion, we will be using a 1/2" seam allowance!!
You can find a great tutorial for making your piping (or welting)
here using 2" bias strips. You need about 100" of piping for the top of the cushion and 100" for the bottom. (You will have excess, but it's better to work with more and cut it down than to have too little!) Using the process outlined in the tutorial, baste the piping to the Mariner's Compass block and to your bottom square. And don't worry, although they have a piping foot on their sewing machine, a zipper foot will work just fine.
The next step is adding the zipper. I chose to add an invisible zipper that is hidden under the piping. It works so well that I forget that the cushion even has a zipper! You can find a great video tutorial for that step
here. I added my zipper along the bottom edge of the cushion. Make sure to leave a 1/2" unsewn space at the beginning and end of the cushion edge.* (See note below for explanation.)
Once you've added the zipper, it's time to put all the pieces all together!
- Make sure your zipper is open at least half way. You will already have one rectangle attached to the bottom square where you've attached the zipper.
- With right sides together (and remember to use 1/2" seam allowance!), pin and sew the remaining three rectangles to the bottom square, starting and stopping 1/2" in from the corners. Back tack every time you start or stop, for stability, but make sure that you don't go into the 1/2" zone at the beginning and end of each straight line of stitching.
- Repeat with the top compass square so that you have an inside out box cushion with slits in the corner sides where the short ends of the rectangles meet.
- Sew together the short ends of the rectangles. Remember to back tack at the beginning and end of your stitching.
- Turn your cushion right side out and stuff with poly fill or have a piece of foam custom cut for it. I have a lot of scrap pieces of batting, so I used those to stuff my cushion!
Whew! You did it! That was a lot of work, but look how cool your cushion is!